
“A nation that destroys its soils destroys itself.”
― Franklin D. Roosevelt
Of all human relationships with our environment, the one that our civilizations and survival as a species most depends upon is our relationship with the soil.
Simply put, soil is where the magic happens. I know, you’re asking yourself what magic is, but…that’s why we call it magic. While we might understand parts of it here and there, having collected some consistent rules of thumb over the millennia that we have coaxed our food out of the soil, the more we learn about soil, the more we realize we have to learn. There it is: Magic!
Since farmers and gardeners aren’t the types to stand around and gawk for too long, let’s get to some of those rules of thumb, shall we?
Soil Texture
Particle Size: Soil is generally made of particles of three different sizes. These are really three ranges of size, but when you start taking a closer look at your own soil, you will see and feel the difference in these three sizes and I’ll explain why they are important.
- Sand: The largest component in what we consider soil, with each grain visible to the naked eye. Sand is just what it sounds like, sand. The perfect example of sand in this context is beach sand. If you think back to a day at the beach, you will remember that although it is constantly flooded with salt water, it dries quickly. You will also remember that there aren’t typically a lot of plants growing in the sand, with the exception of some aquatic plants and a few specialized beach plants. Pure sand is challenging for plants for several reasons. Sand is easy for you to work and dig in with your hands, from a plant’s perspective, that means that it’s not that stable for good root support. Since sand particles are so large, they don’t have a lot of surface area compared to other particle sizes, so water and nutrients drain out of it quickly. This drainage and aeration can be a benefit if you live somewhere that is prone to flooding, but without nutrients, your garden won’t make it.
- Silt: The next smaller sized particles are silt particles. These are just at the edge of what you can see with the naked eye, and while they feel gritty, they are very different from the coarse sharpness you feel when you rub pure sand between your fingers. Silt is typically defined by its place in between sand and clay, sharing some properties with each. For example, it drains more slowly than sand, but more quickly than clay. Silt is easier to work than clay, but more difficult than sand. Without going too much into the geology of how it is formed, silt was once sand that has just been weathered down to a smaller size through natural processes.
- Clay: These particles are too small to be seen by the naked eye. When looking at clay in a jar of water, you just see cloudy, muddy water. Clay particles are slick to the touch. Pottery clay is a great way remember the properties of clay out in the field or in your garden. Think about how much heat and time it takes to get clay to completely dry out. Clay in your soil is the same way. Because clay particles are so small and have such high surface area relative to their total size, they make great sponges for soaking up not only water, but other nutrients and charged particles as well.
What you have Vs. What you want
Now that you have an idea of what you might find when you start digging around in the dirt that will become your garden, here are some tests to figure out what you have.
- Drainage: A good way to test your soil’s drainage is to dig a hole 12 inches deep in the site you are considering for your garden. Next, leaving the ruler or whatever you measured with in the hole, note the time and fill the hole with water. Then observe how long it takes for each inch of water to drain out of the hole. How long did it take the entire hole to drain? You are looking for around 1-2 inches per hour of drainage. Any slower than that and you might have a soil with too much clay. Faster than that, and you might be too sandy to keep your garden watered in dry weather. Adding compost can partially remedy either of those soil problems, but only so much.
- Jar Test for Soil Texture: To test the percentage of each different particle size in your soil, also known as soil structure, you can use the soil jar test.

- You will need: A shovel, 1 clear glass jar with a lid for each area you would like to sample, a detergent of some kind (dish soap or laundry detergent both work), a marker that can write on the glass jar.
- Next, you will go dig a hole. This is where you might want to cut some corners…BUT DON’T!! Dig a hole 12 inches deep with one side of the hole going straight down. If you hit bedrock before you reach 8 inches, you should seriously consider either finding a different place to garden or working with raised beds. If you get at least 8 inches down that is an acceptable soil profile to sample…12 is still better.
- Now take your shovel and scrape a thin layer of the soil from the face of that straight side of your hole and place it in your jar. Remove any large pieces of organic material or bugs. You should only fill your jar 1/3- 1/2 of the way up with soil.
- Add about a teaspoon of detergent, fill the jar with water to an inch below the top. Put on the lid and shake seriously for a couple of minutes. Now put the jar down and go do something else. Really, go do something else like eat dinner or go to bed and leave it for the next day. After a few hours have passed, the sand, silt and clay particles will all settle out of the liquid in size order. The largest (sand) will be on the bottom, and the clay will be the last to settle, on the top.
- DON’T SHAKE THE JAR WHEN YOU COME BACK!
- Measure the layers and calculate percentages! BEWARE! SIMPLE MATH!
- To do this, you are going to measure the total height of the tidy mud stack in your jar (not the water, just the mud). Keep that number.
- Take your marker and look closer at the layers (fancy word: strata) in your soil sample. You will see the individual sand grains in the bottom layer. Follow that layer up to where you start to see a significant change in size or color and mark that line. That is where the silt layer starts. now follow the silt layer up until you see another change, this time from only difficult to see to invisible/cloud. Mark that transition with the marker as well. This is where the clay layer begins. You will notice that if you disturb the jar just a little bit, most likely the water will cloud. This is particles from the clay layer going back into the water column.
- Now to find a percentage of clay (yes, this can be hard to find, you’re not alone), for example, measure from the top of the sample to the line where the silt starts. Take that number and divide it by the total height number you got earlier and that is what percentage clay you have in your soil. Do this for all three particle sizes.
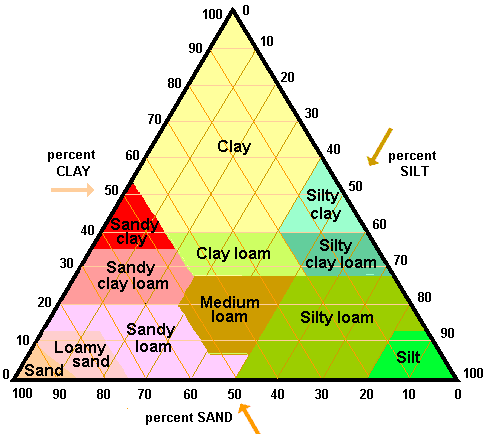
- Ideal soil is supposedly around 40% sand, 40% silt and 20% clay. Soil like this is called loam. Don’t look over your notes, there’s no “loam” sized particle. It’s a term that means great soil that people use on the backs of seed packets to tell you that if you plant those seeds in the perfect conditions with the perfect soil, they will grow the vegetables in the picture on the front. (pro tip: Perfect is overrated!)
Soil Resources for more research (Casual or INTENSE!!!):
Videos of me hitting the high points:
Books:
The Soul of Soil
by Joseph Smillie & Grace Gershuny
This book is a great primer to understanding what is going on in the symphony of microorganisms and nutrients beneath our feet that we call soil. It a quick read (an afternoon if you really focus on it) that starts from scratch on the big principles of soil life. I’ve used this as required reading for my college soils class before the first day of class with success.
by Ray R. Weil and Nyle C. Brady
If you’re looking for a true soils text to take you beyond casual gardening knowledge and into the world of soils meet in the mixture of geology and microbiology, this is the book for you. Accepted as the textbook for rigorous undergraduate soil science study, this one goes in depth in the science of the field and…leaves no stone unturned!!! (snicker)
The New Organic Grower
by Eliot Coleman and Sheri Amsel
Eliot Coleman’s career as a luminary in organic farming techniques with patience, success and a gift for sharing the results in written form that the layperson can understand is unparalleled. His books, particularly this one, have heavily informed most modern organic farming programs, my own included. This book reads like a textbook that has been shaped into an easy to follow narrative that grounds complex subjects in practical examples and experience. Wonderful for beginners to farming and large scale gardening!
Teaming with Microbes: The Organic Gardener’s Guide to the Soil Food Web
by Jeff Lowenfels and Wayne Lewis
Another great primer for the world of invisible activity that is constantly at work beneath our feet to turn minerals and sunshine into food and beauty. This book focuses on defining and explaining the relationships between the fungi, bacteria and insects that all work together to create an environment that plants can thrive in.
You’ve found your soil, now what do you do with it?
Learn more with: Cultivation